Little Paper Creations
  • Blog
  • About
  • Portfolio
  • Etsy Store
  • Quest for Kisses

Playing with Distress Ink: 2

3/31/2015

0 Comments

 
Picture
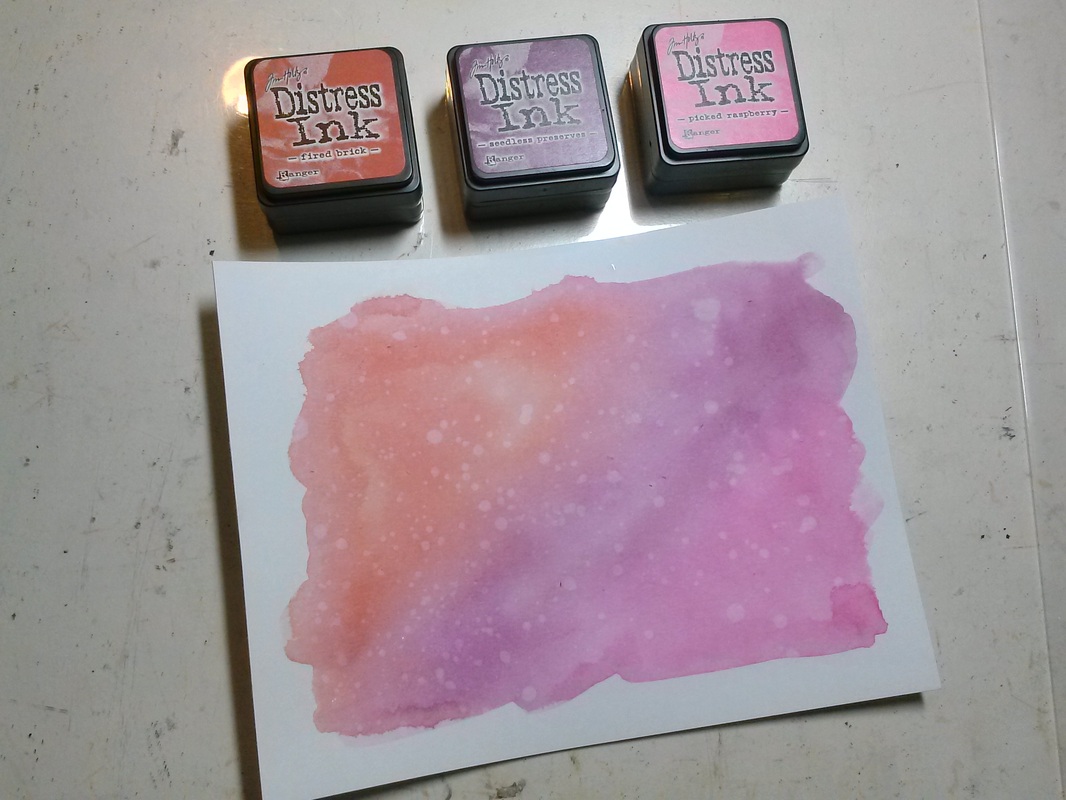
After my first experiment with Distress Inks, I could not stop! I wanted to try another technique.

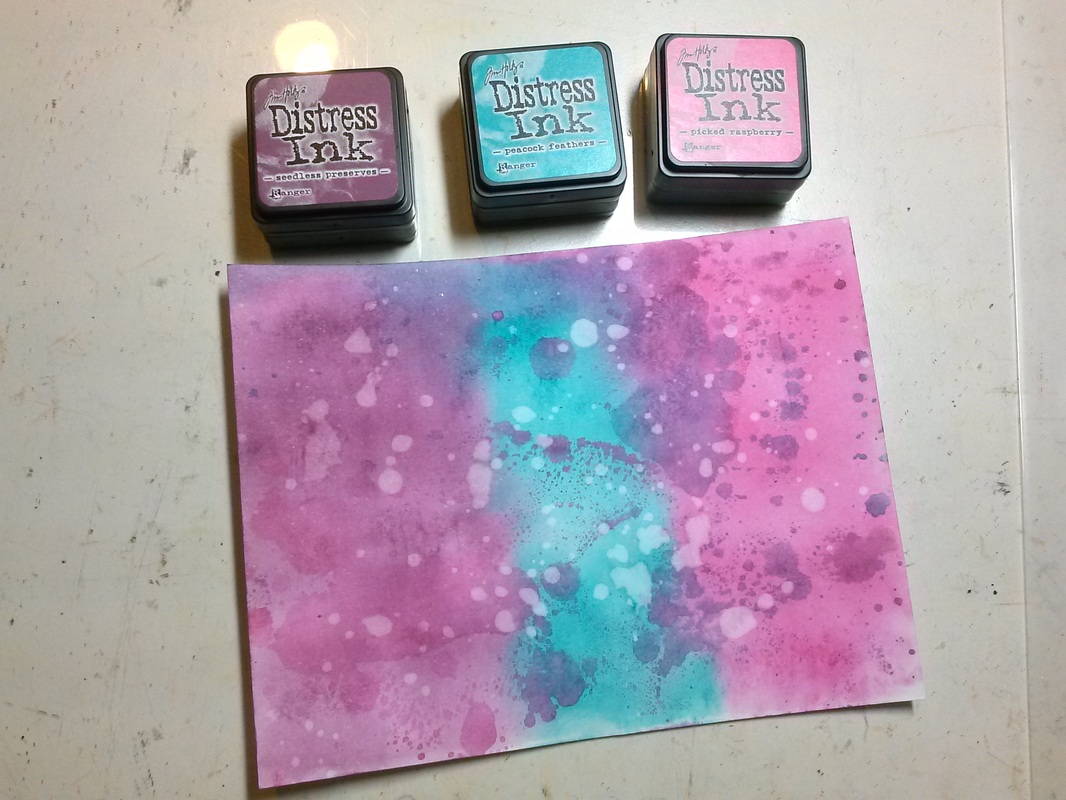
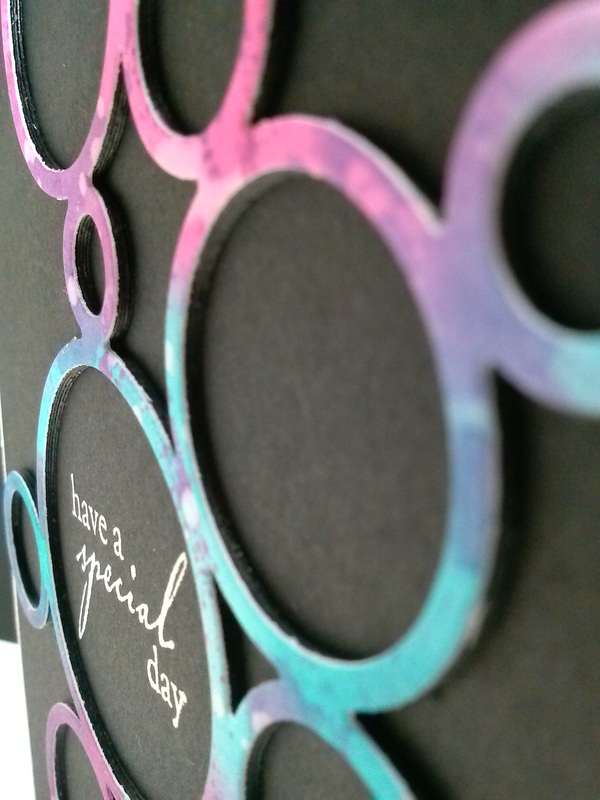
For this round, I used the colors Fired Brick, Seedless Preserves, and Picked Raspberry.

This time, I wet the paper and used a brush to put the color onto the paper. The colors were more muted than they were when I dipped the paper into the water-ink mixture directly. I did drop some water onto the dried base layer to create some lighter spots.
Picture
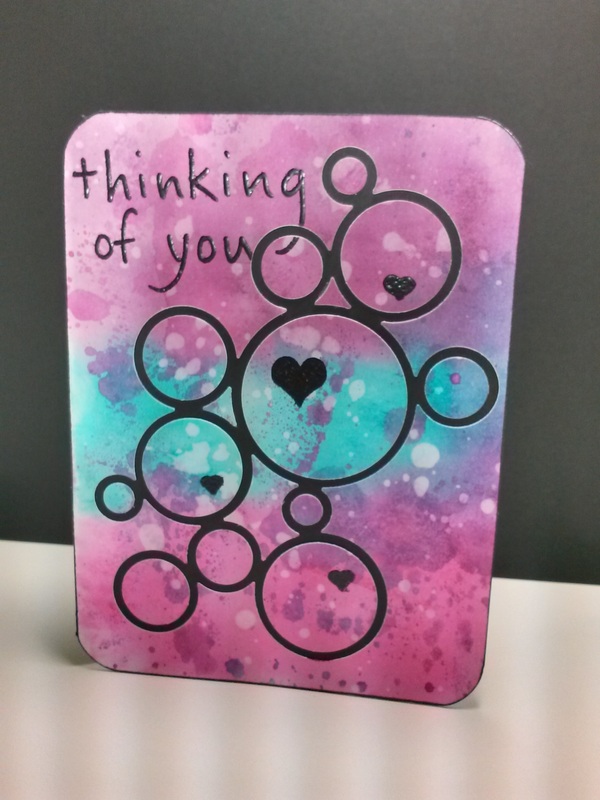
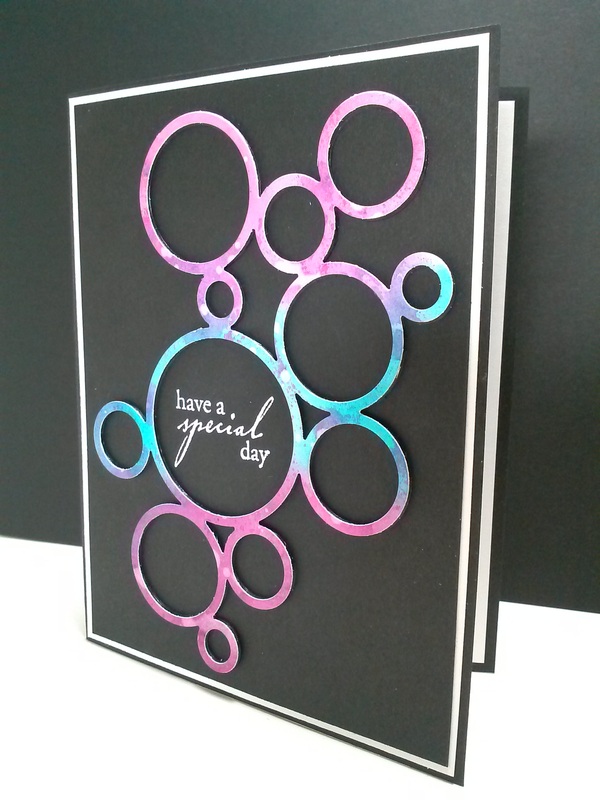
These colors were very Valentine-y, so I decided to go with it, even though Valentine's Day is long gone. I used both the positive and negative of another die. But this time, the cards were quite a bit smaller. I used the die to dictate the size, so the larger card is 4.25 x 3 inches and the smaller card is 3 x 2.5 inches.
Picture
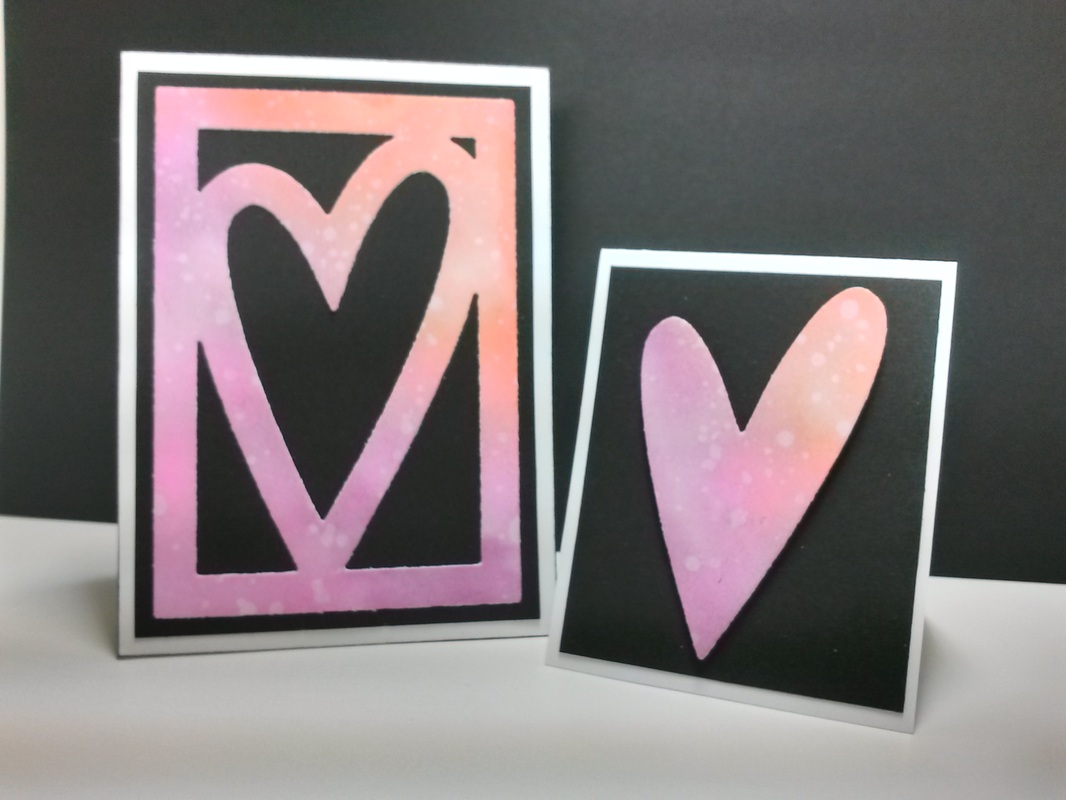
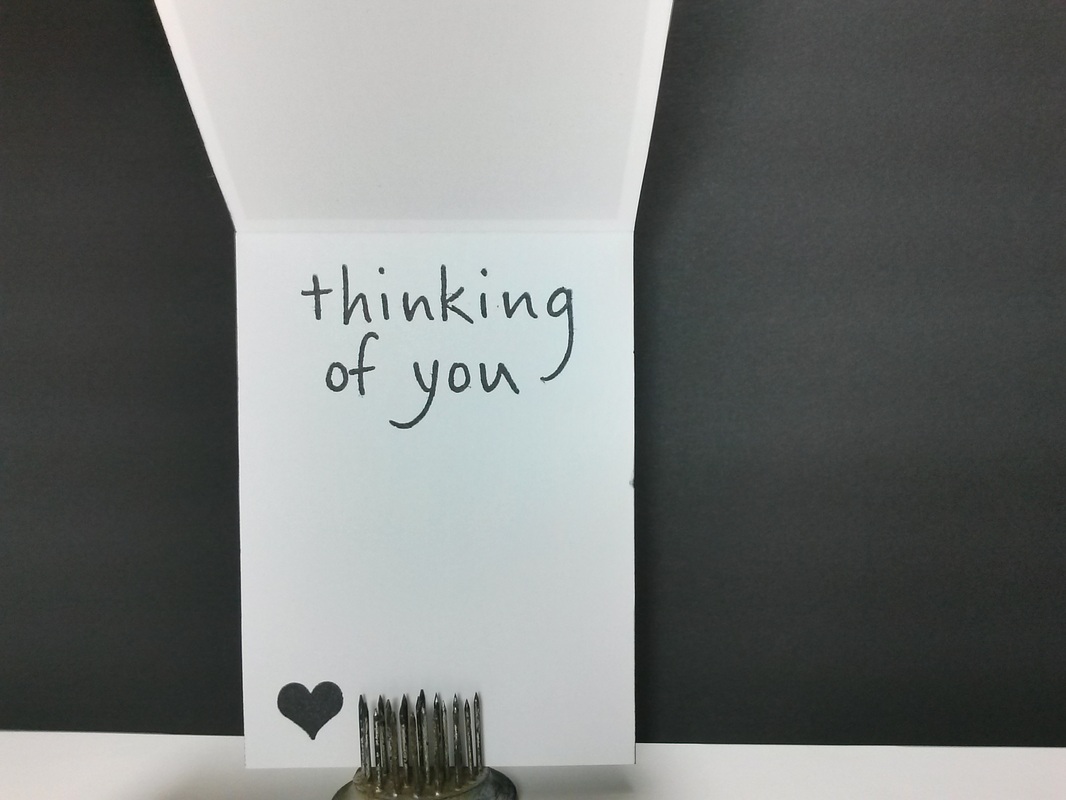
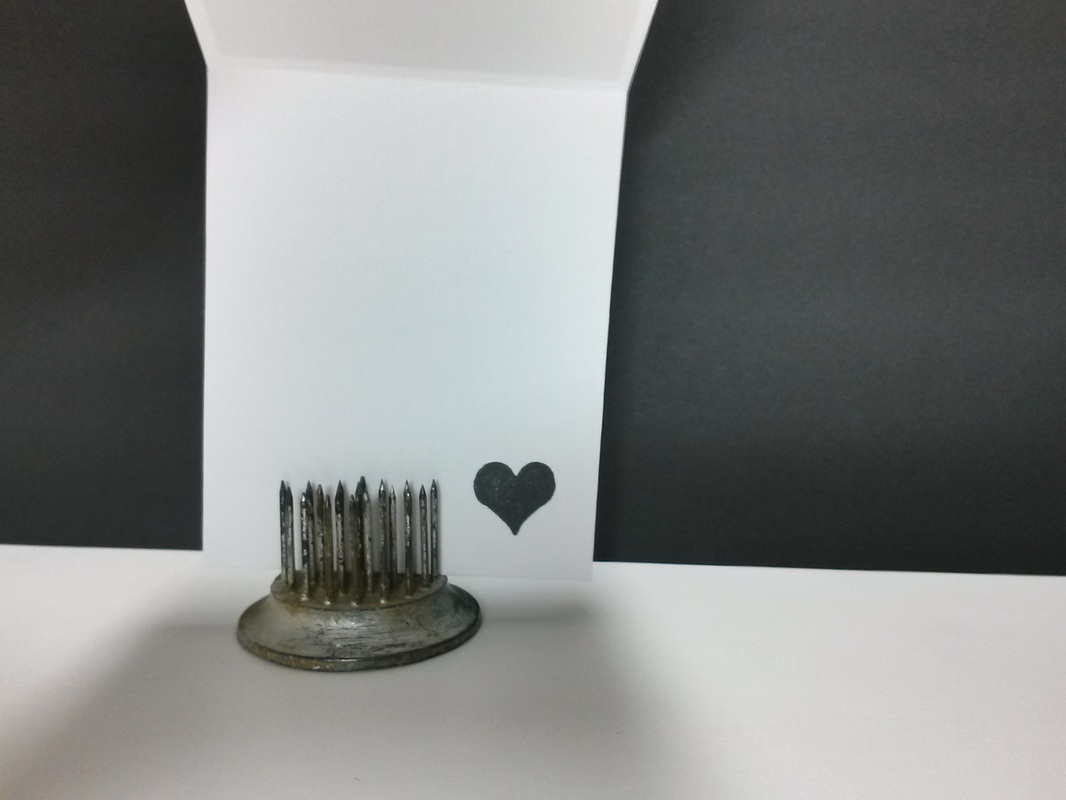
I kept the outsides pretty simple, so I stamped a small greeting on the inside of the larger card and just a small heart on the inside of the smaller card. Both with black embossing powder.
Picture
Picture
This is the first time I've made a non-A2-sized card, and i like it! Quick and easy. I'm not sure how I feel about the brush technique I used with the distress inks. I like the random-ness of dipping the paper like I did the first time. Maybe I will use this technique when I need a lighter, more subtle color or when I want more control over where the colors go.

I can't wait to try more!
Happy Crafting!
0 Comments

Teddy Bear, Teddy Bear, Turn Around!

3/24/2015

0 Comments

 
I feel like I was just writing about my little sister getting married and now here I am announcing that she's pregnant! She's due in May, which means baby showers are coming soon! My mom's friends are throwing her a shower and they came to me for invitations. The only request? Teddy Bears.
Picture
Teddy bears? I can do teddy bears!

I found a stamp set and matching die set at Mama Elephant and got to work right away.

First, I printed and die-cut the text part of the invite.
Picture
Then I stamped and die-cut dozens of adorable little bears.
Picture
Then I was on to assembly.
Picture
Picture
Picture
The thing I like best about these invitations is that they are not all the same! I made 10 invitations and while the colors, style, and layout are all the same, the pattern combinations are all different!
Picture
These were so much fun to make! I got to use the die-cut machine I got (from my sister!) for Christmas, I had complete creative control over the design (thanks Carol!), and I got to use tons of patterned paper! I love patterned paper!
Picture
So what do you think? Are these bears adorable or what?

Happy Crafting!
0 Comments

Playing with Distress Inks

3/17/2015

0 Comments

 
I recently purchased some mini distress ink pads and I think I'm in love! These are so much fun to play with, I'm hooked. All you need is the inks, some water, and some paper and you're ready to go!

I thought it would be fun to show some of my experiments here, so I'm starting a new series:
Picture
The first creation I made used the colors Seedless Preserves, Peacock Feathers, and Picked Raspberry. Aren't these names fun?

I smeared the ink on a plastic surface, sprayed it with water, and dragged my piece of paper through it. After I dried the base layer, I went back and picked up some splotches of color over the top and dried it again. Lastly, I dropped some water on top and blotted it off to take the ink away.

I love how it came out!
Picture
I decided to use this piece to play with one of my new dies. I cut out the shape and used the positive shape to place the negative space pieces on the black card base. Then I heat embossed a greeting and some hearts with black embossing powder. Lastly, I rounded the corners and card number one was done!
Picture
Picture
For the second card (because I didn't want a single bit of this beautiful paper to go to waste), I used the positive shape I had die cut. I cut out 3 more shapes from black cardstock and layered them all together to get a 3-dimentional effect. A quick white embossed sentiment finished off this simple card.
Picture
Picture
I am so happy with how my first distress ink play-time went! It was really fun to see how distress inks work together and react to water, plus I got 2 beautiful cards out of it, too!

Have you ever used distress ink? You should, it's amazing!

Happy Crafting!

P.S. If you'd like one of these cards, they are available in my Etsy store!
0 Comments

Erin's Wedding Stationary Extravaganza! Part 2

3/11/2015

0 Comments

 
Last week, I shared with you my sister's wedding invitations and thank you cards. This week, I'm going to share the rest of the stationary I made for her wedding.

Erin's Wedding Stationary Extravaganza!
Part 2: Programs and Reception Details
Picture
Once I figured out that I could scan and digitally manipulate the hydrangea stamp image I'd been using on the invitations (etc), I got really excited about making all the reception details!

I began with the programs. I printed them on 4 1/4 x 11 inch paper that had some shine/shimmer to it. Because who doesn't love some bling and glam on their wedding day? The front has the ceremony program and the back has the wedding party and other information. Both sides have a light hydrangea printed under the text. I was so happy at how the hydrangea came out! It was the perfect accent; it added to the feel and design of the program without distracting the reader from the text.
Wedding program - shimmer paper, periwinkle, blue, purple hydrangea
I know many of you don't know my sister personally, but trust me when I say, it would not be Erin's wedding without a lot of good food. Specifically, a lot of good sweets. So we put together a candy bar!

My mom worked hard to find a large variety of blue and purple candy and all the lovely glass containers to serve it all. I made all the signs so people would know which variation of sugar they were feasting upon.
Candy bar - blue and purple candy with hydrangea tent signs
Next up were the table signs and seating cards. The seating cards were tricky because they needed to be small enough to be unobtrusive on the tables, large enough to be easily read, and they needed to have some way to denote if the guest had ordered chicken or beef for dinner. Which I guess is usually done by having two different colors. But I didn't have 2 colors to work with. Unless you count black. Which I do not. So what I came up with was printing the small hydrangea on either the left or right side to denote their dinner choice. Chicken on the right, beef on the left. And no, that was not an arbitrary choice. 'Beef' has 4 letters, as does 'left'. There's always a method to my madness!
Wedding seating card tents - periwinkle hydrangeas
Wedding table marker sign - periwinkle hydrangea
The final, but most lasting, part of Erin's stationary were the reception cards. I have always thought that guest books are kind of dumb. I mean, you invited these people, you know who was at your wedding, you don't need their signatures to prove it! So for my own wedding (back in 2007), I came up with the idea of reception cards. They are 4x6 cards on which guests can write well-wishes, advice, jokes, or congratulatory messages. When you have collected them all, just slip them into a photo album and you're done! These are so much more personal and fun to look back on than a guest book. Plus, after a few glasses of wine, some of the guests can be pretty hilarious!!! I created 3 different designs so guests could decide which card(s) they wanted. Erin and Justin had a great time reading through them the next day at the gift opening!
Wedding guest book alternative - periwinkle hydrangea - reception cards - advice cards
Well, that about wraps up my sister's wedding! I hope you enjoyed reading about it as much as I enjoyed creating for it. Actually, there's no way that's possible - I had an absolute blast making everything for my sister!

It was a lot of work, but totally worth it to see how much Erin, Justin, and all their guests enjoyed all the details that went into their special day. I also learned a lot about creating coordinating designs in large quantities.

I am very excited to help other brides realize their wedding visions, and I've actually got 2 brides lined up already! More details coming soon!

Thank you for reading, and Happy Crafting!

** All photos in this post are from Bellagala Photography **
0 Comments

Erin's Wedding Stationary Extravaganza! Part 1

3/3/2015

0 Comments

 
My sister got married!
The wedding was in July and it was so amazing!
Picture
Picture
My mom and I helped Erin with a lot of the wedding prep, including decorations, organization, vendor details, and of course wedding stationary! I made her save-the-dates, invitations, thank you cards, programs, seating cards, table signs, candy table signs, and guest book/advice cards.

By the time I was done with everything, I was kinda tired of looking at periwinkle and hydrangeas. Which is why it has taken me this long to get this post up. But now that I've had some time away from periwinkle and I've done some other projects, I am excited to show you my largest (and most fun!) project to date.

Presenting...

Erin's Wedding Stationary Extravaganza!
Part 1: Invitations and Wedding Thank You cards
Since I had already made her save-the-dates, I kind of knew what layout I would use for the invitations. I printed the text, stamped the double-stamp hydrangea in the corner, matted on black cardstock, and attached stamped vellum over the top.
Picture
Here's a close-up of the double-stamped hydrangea. I go over the details of the double stamping in my save-the-dates post. I had to print out a lot of trials before finding the exact right curve for the text to go around the stamp.
Picture
The vellum overlay had hydrangeas stamped with clear ink. It made a watermark image on the vellum that looked really neat in person, but would not photograph for me! I had to really distort the colors in this picture so I could show the slight watermarked image on the vellum. I then attached the vellum to the invitation with small silver brads.
Picture
The RSVP cards are almost identical to the save-the-date cards, and the direction cards are just printed on white cardstock.
Picture
Erin and I had similarly-sized weddings, and I did make all the invitations for my own wedding, but oh my, this was a big project! I made 145 invitations and RSVPs when all was said and done, and I only have 2 left over for my portfolio!
Picture
It wasn't until I had finished all 100 save-the-dates, 145 invitations, and 145 RSVPs that I had the genius idea to scan the stamped hydrangea and just print it on the paper with the text.

*face palm*

So that's what I did for the thank you cards. Which made it a million times easier, especially because I had to make 100 of those! I enjoyed adding a little bit of digital design into some traditional paper cards. It let me get the exact look I wanted without worrying about variables like ink coverage and user error lining up the images.
I used the same periwinkle and black cardstocks from the invitations, but I added some silver cardstock as well.
Picture
Erin loved how her stationary turned out and I am pretty pleased as well!

Check back next week and I'll have Part 2 of Erin's Wedding Stationary Extravaganza!

Until then, Happy Crafting!
0 Comments

    RSS Feed

    Blogs I read:

    Becky Higgins
    Bits & Pieces
    KWerner Designs
    Jennifer McGuire Ink
    I Could Make That
    Linny's Vault
    Pintester


    Categories

    All
    #30DaysofCreativity
    Baby
    Baby Shower
    Binder
    Calendar
    Cards
    Christmas
    Coupons
    Craft
    Distress Ink
    Etsy
    Fabric
    Family
    Feedbackplease
    Field Trip
    Flashback Friday
    Food
    Gift
    Haul
    Home
    Inspiration
    Internet
    Invites
    Magnets
    Organization
    Paint
    Photos
    Planner
    Project
    Project Life
    School
    Scrapbook
    Special Order
    Special Order
    Storage Solutions
    Thinking Of You
    Tips And Tricks
    Top5friday
    Tutorial
    Wedding


    Archives

    February 2016
    January 2016
    November 2015
    October 2015
    September 2015
    August 2015
    July 2015
    June 2015
    May 2015
    April 2015
    March 2015
    February 2015
    January 2015
    September 2014
    August 2014
    April 2014
    February 2014
    January 2014
    August 2013
    July 2013
    August 2012
    July 2012
    June 2011
    January 2011
    December 2010
    August 2010
    July 2010
    June 2010
    May 2010

Powered by Create your own unique website with customizable templates.