Little Paper Creations
  • Blog
  • About
  • Portfolio
  • Etsy Store
  • Quest for Kisses

Days 16-18... catching up!

6/24/2011

2 Comments

 
Picture
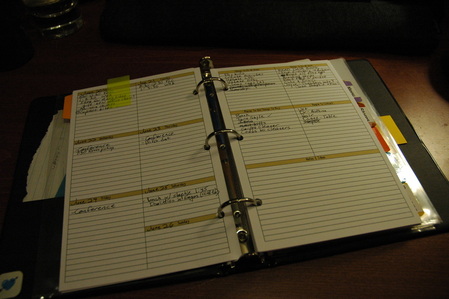
Days 16 and 17 brought with them a need to organize my life. I spent day 16 creating the prototype and day 17 creating a printed version of a personal planner. On the left are the days of the week where I can write not only appointments and reminders, but notes from the day, which will be useful in creating my week in review scrapbook pages. On the right are spots for lists; Things To Do @ Home, Things To Do @ Work, Places To Go, People To Contact, and a big spot at the bottom for Notes & Ideas. I'm really liking it so far, I just hope I can keep up with it for long enough to be useful long term.

Picture
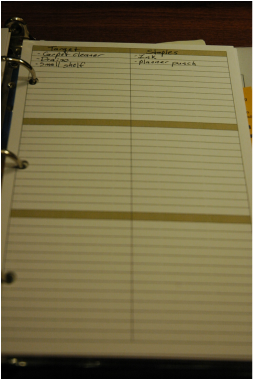
Day 18 found me with a need to expand my planner. I added 2 more sections: Menu/Grocery Lists, and Store Buy Lists, where I can write the name of the store and keep a running list of items I need there, so when I have enough items, or time to go, I can remember everything I need.

2 Comments

Days 7-15... a little behind...

6/22/2011

0 Comments

 
So... I got behind in posting my creations for 30 Days of Creativity, but I kept up pretty well. Here's a quick list of what I made:


On Day 7, I made sale signs for my garage sale! 
Picture
Picture
Day 8 was an apron to hold all the money I planned to rake in during my garage sale.

Picture
Days 9 and 10 were devoted to organizing and displaying all my junk at the garage sale (I was a bit consumed with the sale, if you can't tell already!)

Picture
Day 12 (I missed 11 because I was so busy with the end of the garage sale) was a culinary creation. Baked tomatoes with parmigiana cheese and basil. So tasty!

Picture
Day 13 was an online creation. I made a google calendar for household reminders. Like when to change the furnace filter and when to trim certain bushes outside.

Day 14 was an accidental creation, but I was busy, so I counted it. I burned myself making breakfast. It puffed up into quite a little bubble during the day. Now on day 22, it's reduced to a bright red puckered scar look. I hope it'll go away soon.

Picture
On Day 15, I created many, many meal components to be ready whenever I need them. Pork chops, sliced bell peppers, cucumbers, broccoli, beans, pea-pods, zucchini, spinach, and leafy lettuce. And a new way to store asparagus!

Picture
That's enough catch-up for tonight. I will update on days 16 and on as soon as I can. There are a few days I missed, but I'm having fun finding a creative outlet every day!
Thanks for stopping by!
0 Comments

Day 5 - Fabric Roses (and Day 1 update!)

6/7/2011

1 Comment

 
I'm a few days behind on photographing and posting my creations, but never fear, I am keeping up with the creativity! For Day 5, I tried yet another new technique. Fabric roses. I ripped a few stips from an old purple sheet I got long ago with the intent of practicing with my sewing machine... that may have to be another day of creativity...
Picture
I'm not sure what I want to do with them yet. Brooch? Hair clip? Headband? I didn't want to put anything permanently on the back, so I put a safety pin on the back of the big one and attached a barrette to wear on Monday. I tried to get a photo with my phone. This is the best I could do:
Picture
I also got around to filling my organizational tower that I made on Day 1. I filled the bottom level with my paints, ink refills, and glitter glue. The middle level has all my mini stamp pads, and the top level is for misc tools. I really like how it turned out, but I'm still trying to figure out exactly where to put it...
Picture
I kinda want to make more...
1 Comment

Day 4 - Lace Cuff Bracelet

6/4/2011

2 Comments

 
Tonight I went out to eat for a friend's birthday. I wanted to wear my new vest and needed some accessories to go with it. Here's the vest:
Picture
I wore it with a tuxedo-style girly top - I couldn't find a picture of it online and I didn't get a picture of me in it.

Anyway, I started out today wanting to make some arm warmers to wear with it because the shirt has tiny cap sleeves and I have a tendency to get cold. So I found some shirts that I could chop up to create arm warmers from, and came across an old button-up shirt. I though it would be perfect to make warmers out of those sleeves because it would be a natural match to the vest! Unfortunately, I could not figure out how to cut them so they would stay up on my arms (sweaters work really well, button-up sleeves do not). So I shrunk my idea.

I cut off the cuffs only, got some matching lace & buttons, and started gluing away. I could have sewn them, but I was short on time and I am not very skilled with my sewing machine yet.

This is what came out:
Picture
Picture
Picture
Cute, right? Kinda 80's, kinda goth, kinda Victorian. They kept my wrists warm and I got a couple compliments from my friends. They even said I should make them and sell them on Etsy! What do you think? Would someone buy them? How much could I sell them for? I have some ideas for other embellishments and finishing the edges better. Plus, I would actually sew them instead of hot glue.

I'm having so much fun with 30 Days of Creativity! I can't wait to see what I come up with tomorrow!!!
2 Comments

Day 3 - Lovely Lunch

6/3/2011

1 Comment

 
Today's bit of creativity comes in food form. I got an idea to make a BLT with an egg in it! Instead of just throwing it together, I decided to be more intentional and beautiful with it.

I cut everything into a perfect circle with a cookie cutter and then cooked the egg in it!
Picture
Then assembly, a few quick photos of my own Egg-McMuffin, then Nom Nom Nom!
Picture
I do wish I had cut the lettuce into a circle as well - I think that would have looked just about perfect, but this was pretty damn tasty!
1 Comment

Day 2 - Veggie Printing

6/3/2011

1 Comment

 
Inspired by Pinterest once again, I did a very simple project today. I made a stamp out of something I had lying around - the base of a stalk of celery.

I have not ventured into vegetable prints since the days of potato-carving-preschool. And let me tell you, it's fun! The celery base prints look like roses, so I knew I was going for an organic, natural look.

I chose 2 colors plus gold for some shimmer, and went nuts! Here's what came out:
Picture
I mostly printed on white paper knowing it would show up the best, but I also tried one sheet of black. It turned out nice, but not as clear of an image for some reason.

I kept playing till the paint on my plates ran out, then I cleaned up a bit and went to bed.

When I woke up this morning, I realized I had not thrown away the celery. And it looked so cool! I ended up spreading the stalks away from the center and this is what the paint did on the inside:
Picture
Beautiful, right? I love how the paint dripped down into the creases of the celery, creating it's own unintentional work of art.

I'm glad I didn't throw it away last night!
1 Comment

30 Days of Creativity 2011 - Day 1

6/1/2011

1 Comment

 
When a friend reminded me 4 days ago that 30 Days of Creativity was starting soon, I had to do some quick mental math. Was it really June already!?!?! Where has the year gone!?!

Once I got over the shock, I got really excited. You see, I've been hanging out at (read: refreshing non-stop) this new website called Pinterest. It's a site where you can create boards and 'pin' interesting photos to them. And they link back to the website you got them from. And other people can see what you pin. And you can see what other people pin. And you can repin their pins. And it's just a huge circle of creative awesome!

*breath*

So, needless to say, I've found a ton of ideas on this site, and I've already got a list of about 15 things I want to make for 30DOC this year. My goal is to try to make something I've never tried before for at least half of the days. 

And today was Day 1. I decided to make something I've been thinking about for a long time; a tiered serving tray from plates and candle sticks. But this one has a twist - instead of plates, I used cake pans! I saw the twist on Pinterest and loved it! A little bit glam, a little bit grunge. Just my style!

Step one was to hit up my favorite thrift store for supplies, then out to my brand new spray paint place!
Picture
Once the paint was dry, I headed in assemble. I began to realize that this project was going to take quite a bit of patience to let things dry. 

Here's the before (with painted candlesticks):
Picture
And here's the after!!!!
Picture
I love how it turned out! The green is the perfect color and (even though it's hard to tell) the pans go from largest at the bottom to smallest at the top. It's going to hold so much fun stuff!!!

I have to let the glue cure overnight (more waiting!!), but I will post a picture tomorrow of it all loaded up! I can't wait to see it!
1 Comment

Oops! Catch-up time!

7/6/2010

0 Comments

 
Wow... um... I've been gone awhile... sorry!

This summer has just been flying by, I'm not sure where all my time is going!

I was doing so well with the 30 Days of Creativity challenge, then I kind of petered out. I have done some more little things, but I didn't keep my momentum from the first half of the month. My hubby really kept his momentum going and ended up making about 20 drawings. Maybe more!

Anyway, here's what I've been up to the last 2 weeks:

I've been completely lost in a series of books that I love: The Sword of Truth series by Terry Goodkind.
Picture
I have read all 11 of these books before, but I was sucked back into the whole series when I mindlessly picked up the first book (Wizard's First Rule) one night on my way to bed. And now I have to finish the whole series.


I've also been working on some little crafty projects.
I made some calendars the other day:
Picture
These will be up in my Etsy store in the next couple days.


And I spent a couple hours one night sketching out an idea instead of sleeping. I had to get this idea out of my head so it didn't disappear: Adult Merit Badges!
Picture
I will be expanding on this idea later, but for now, I just sketched out 8 immediate ideas of what you could get a merit badge for as an adult. Here the list:
* Get Married (or civil union)
* Have a Baby (I'm also thinking ones for adoption, twins/triplets/etc, 2nd/3rd/etc child)
* Buy a house
* No IKEA furniture in your house (that's supposed to be the IKEA guy...)
* Joint Bank Account
* Build or Fix Something Major
* Host a Holiday
* Live by Yourself

That's all I have right now. Any more ideas?
I'm not sure if these will be digital badges, paper badges, iron-on transfers, or what, but this is a project I definitely want to pick up later. I would love to hear any ideas you have about them.

For now, that's all I will leave you with.
Tomorrow I will post my fireworks photos - I have several that I really love!
Thanks for reading!
Happy Creating!
0 Comments

#30DaysofCreativity - Organization!

6/19/2010

0 Comments

 
I L-O-V-E to organize! I will happily plop down in the middle of a giant mess and methodically sort everything into it's proper place. (As love as I don't have to clean it, too!)

So as one of my 30 days of creativity, I created a new organizational system for some of my paper that's been getting away from me. I like to buy pads of paper to work with - it gives me lots of paper that already looks good together, it usually comes with some solid or near-solid papers so I don't have to buy extra, and they always have really fun designs! I especially like 5x7 pads. For some reason, they don't intimidate me and it's usually just the perfect size and amount for full sets of cards.

After buying (and using) many of these 5x7 pads, I was having trouble keeping them together and visible enough that I would still use them. I needed to be able to see them all, I needed to be able to get them out easily, I needed to be able to keep papers from one pad together, even after they had been pulled out and even cut up, and I needed the solution to be cheap and cute!

And here's what I came up with:
Picture
I got this basket/bin from Target for about $5 (I actually got 2, the other one holds cd cases of acrylic stamps) and the 5x7 pads fit perfectly in it! I knew I needed some way to separate the sets from each other and keep them self-contained, so I cut up regular file folders and put the sets of paper in them - another perfect fit!
Picture
And to keep the patterns in the pads visible, I tore off the front cover of each of them and attached it to the inside of the file folder so I could see at a glance what I have to work with.
Picture
I like this system because it's easy to maintain, it's flexible, it's easily added to when I get more paper, and it's cute! I kind of want to make the same type of thing for all the 8x8 pads I have, but right now, they are easily accessible in a clean magazine holder, so we'll see if I ever need to change that. Besides, the file folders wouldn't stick up far enough like these do.

Let me know what you think of my new system! Do you have a paper-organizing system that works for you! Please share, I could always use more ideas!

Happy Creating!
0 Comments

Exciting Announcement and Daily Creativity

6/15/2010

1 Comment

 
Hmm... which first; the announcement or the creativity?

Announcement!

This week, I will be a part of a 12-day giveaway extravaganza on Linny's Vault! (Check out her adorable button over in the right column on this page.) I am so excited because Lin first contacted me about a month ago because she saw my Etsy site and liked what she saw. She wanted to feature my store for one of her days of giveaways in celebration of her blog's one year anniversary. A Blog-o-versary! Of course I said yes!

I've been working hard this last month to get some new stuff up in my store and get this site up and functional. My giveaway is on Friday, June 18 (also my husband's birthday!!!), so if you are coming from Linny's Vault, welcome!

Which leads me to my creativity for the day.

I made some gift card holders. They are a card and a gift in one! (as soon as you put a gift card inside, that is!)
Picture
Glittery Flowers
Picture
The inside of the Glittery Flowers cards
Picture
Happy Birthday! How many fingers are you? Blank insides.
Picture
A simple flower with cutout circles. Polka-dots inside.
Cute, right? I just pulled out a bunch of paper and started putting things together. I had a lot of fun working with such a small project.

So I'm really excited for this coming week. What are you looking forward to?

Happy Creating!
1 Comment
<<Previous

    RSS Feed

    Blogs I read:

    Becky Higgins
    Bits & Pieces
    KWerner Designs
    Jennifer McGuire Ink
    I Could Make That
    Linny's Vault
    Pintester


    Categories

    All
    #30DaysofCreativity
    Baby
    Baby Shower
    Binder
    Calendar
    Cards
    Christmas
    Coupons
    Craft
    Distress Ink
    Etsy
    Fabric
    Family
    Feedbackplease
    Field Trip
    Flashback Friday
    Food
    Gift
    Haul
    Home
    Inspiration
    Internet
    Invites
    Magnets
    Organization
    Paint
    Photos
    Planner
    Project
    Project Life
    School
    Scrapbook
    Special Order
    Special Order
    Storage Solutions
    Thinking Of You
    Tips And Tricks
    Top5friday
    Tutorial
    Wedding


    Archives

    February 2016
    January 2016
    November 2015
    October 2015
    September 2015
    August 2015
    July 2015
    June 2015
    May 2015
    April 2015
    March 2015
    February 2015
    January 2015
    September 2014
    August 2014
    April 2014
    February 2014
    January 2014
    August 2013
    July 2013
    August 2012
    July 2012
    June 2011
    January 2011
    December 2010
    August 2010
    July 2010
    June 2010
    May 2010

Powered by Create your own unique website with customizable templates.