I wanted to start a feature called Flashback Friday where I would showcase a project I had done in the past. And I had it all planned out for this last Friday to showcase my wedding paper creations. I had photos, ideas, I was even starting to write out the post in my head.
Then I got sick.
It happens every year at the end of school. My body shuts down, whether from exhaustion, relief, or all those little preschool germs finally getting to me. And every year, I forget about it till I actually get sick! So Friday night and all day Saturday, I was out with my yearly cold and unable to write my Flashback Friday. Now that it's Sunday, I thought about writing something else, but I am so excited about telling the story of my first huge jump into cards and invitations, I decided that this will just have to be Flashback Sunday instead.
~*~*~*~*~
My husband Mike and I were married on June 29, 2007. But this paper creation story starts well before that. When we started making wedding plans in the spring of 2006, we knew we wanted to save money. The first, and most obvious choice was to make all the invitations ourselves. Well, not ourselves, myself. Since I worked a second job at a scrapbooking store (Artsy Tartsy) at the time, I had tons of resources and supplies at my fingertips.
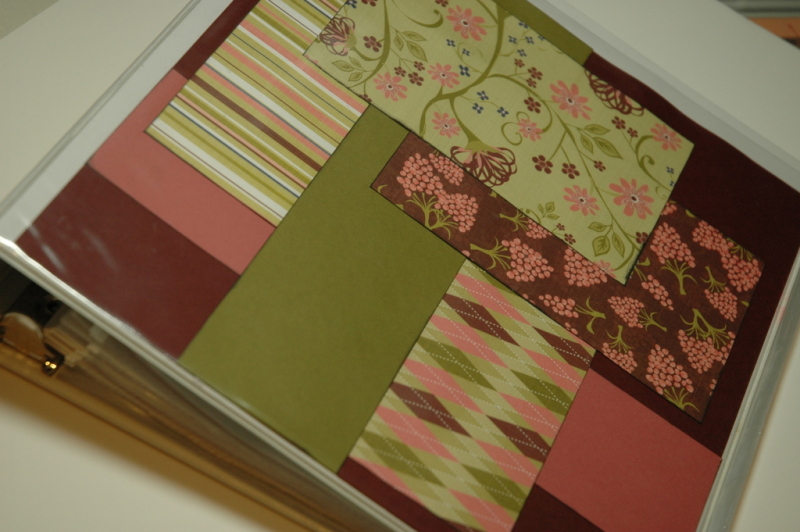
Usually, brides pick out their dresses, their flowers or at least their colors before anything else. I picked out my paper before anything else. No joke! I could not move ahead in any of my planning until I had picked out paper that I loved. And I fell in love with this:
Then I got sick.
It happens every year at the end of school. My body shuts down, whether from exhaustion, relief, or all those little preschool germs finally getting to me. And every year, I forget about it till I actually get sick! So Friday night and all day Saturday, I was out with my yearly cold and unable to write my Flashback Friday. Now that it's Sunday, I thought about writing something else, but I am so excited about telling the story of my first huge jump into cards and invitations, I decided that this will just have to be Flashback Sunday instead.
~*~*~*~*~
My husband Mike and I were married on June 29, 2007. But this paper creation story starts well before that. When we started making wedding plans in the spring of 2006, we knew we wanted to save money. The first, and most obvious choice was to make all the invitations ourselves. Well, not ourselves, myself. Since I worked a second job at a scrapbooking store (Artsy Tartsy) at the time, I had tons of resources and supplies at my fingertips.
Usually, brides pick out their dresses, their flowers or at least their colors before anything else. I picked out my paper before anything else. No joke! I could not move ahead in any of my planning until I had picked out paper that I loved. And I fell in love with this:

Chatterbox Nook Collection
It was funky and girly and all of my favorite colors in one. I quickly bought out all we had in stock and asked the owner to order more! I began by making myself a planning book. And how perfect to have my color right on the cover - no need to drag around samples; there were right there with me all the time!
After pouring over books and magazines dedicated to weddings and invitations and cards, I finally came up with a samples of all the things I was going to make. I measured, cut, inked, and assembled, and with the help of my sister, I finished all our wedding invitations!
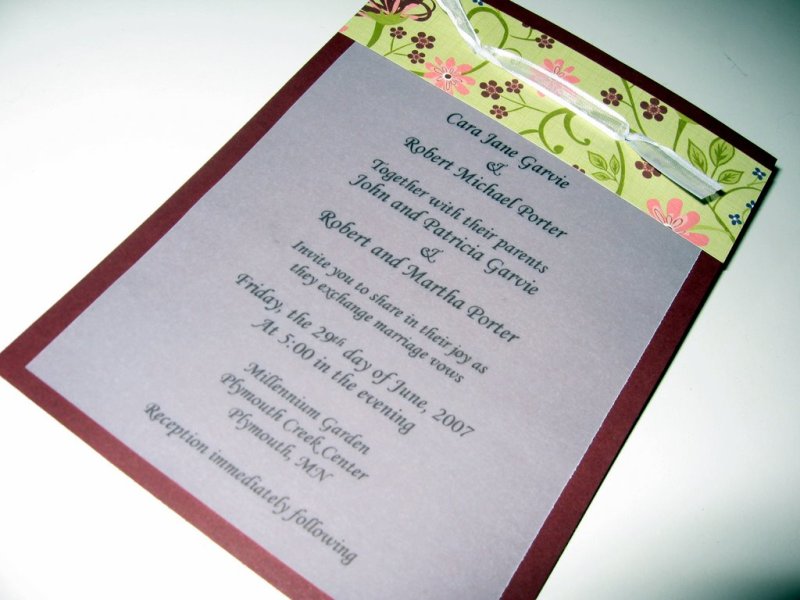
Simple, elegant, and with a touch of personality. But I wasn't done.
I didn't like the tradition of a simple guest book. Too impersonal. After all, I knew who was at my wedding, why did I need all their signatures? So I got an idea from a wedding magazine for reception cards. 4x6 cards that you put on the reception tables for people to write down their well-wishes, advice, and (as in the case of our friends) humor! So that's where I put in more personality and color!
I didn't like the tradition of a simple guest book. Too impersonal. After all, I knew who was at my wedding, why did I need all their signatures? So I got an idea from a wedding magazine for reception cards. 4x6 cards that you put on the reception tables for people to write down their well-wishes, advice, and (as in the case of our friends) humor! So that's where I put in more personality and color!

Way cute, right?
But again, not done.
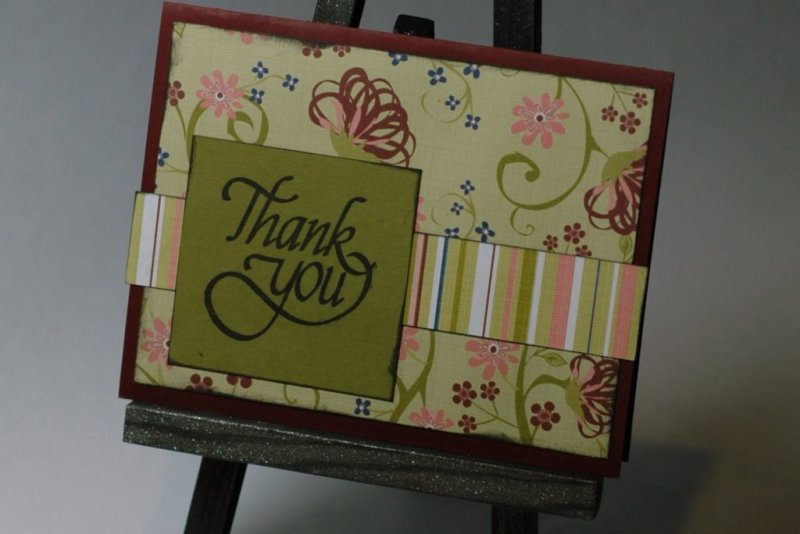
I was on a creative roll. And I was loving every minute of it! Next on the list was thank you cards.
But again, not done.
I was on a creative roll. And I was loving every minute of it! Next on the list was thank you cards.
And slightly less creative; programs:

The hardest thing about my wedding day was the fact that I could not have my camera in my hand. Seriously! Everything else went beautifully, there were no major problems. But I was constantly seeing photos I wanted to take. Now, I had done some major research on photographers and I had chosen a husband-wife team who I knew would capture my vision perfectly (and they did), and I had several trusted friends and family members armed with cameras of their own. But I still wanted all the photos I could get. From every perspective. So Mike and I made up these:
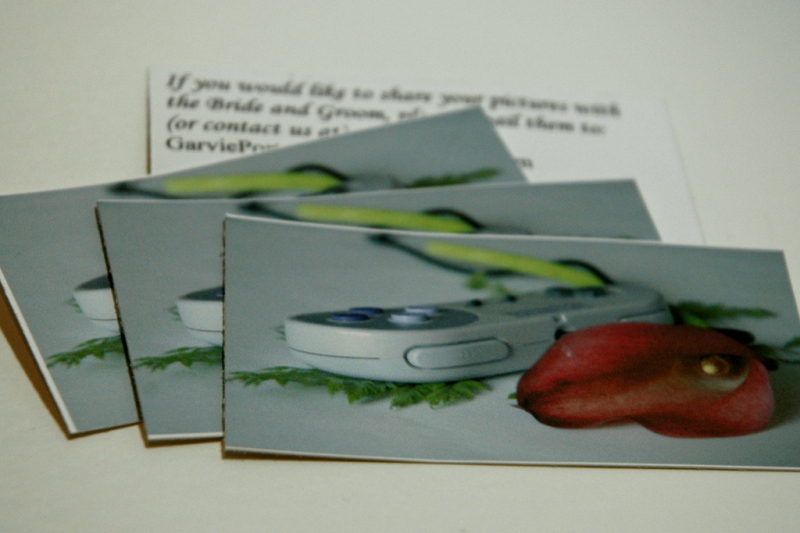
Little business cards with our contact info on them so people could send us their photos. And we took that photo on the front ourselves. For those of you who are confuse; it's a video gamy controller wound around a calla lily (our wedding flowers). I call it "Gamer Romance".
So that about wraps up everything from my wedding! This was the most ambitious, most time-consuming, and most fun project I have ever done. The things I learned from this giant project was:
1) Adhesive is expensive - buy in bulk.
2) ALWAYS use a good quality, SHARP cutter.
3) One step at a time to prevent getting overwhelmed.
Thanks for reading my giant post!
 RSS Feed
